
Google Analytics 4 (GA4) has been available since October 2020 and is now the default Google Analytics programme. The older version, Universal Analytics (UA or GA3), is due to stop collecting data on the 1st of July, after which it will be completely replaced by GA4.
If you already have Analytics set up, and have done for a while, you’re likely to be using UA (the older version). If you’re on the older version, or haven’t set up Analytics at all, this guide is for you.
To find out which version you have, open Analytics and select the name of your account at the top of the page (next to search). Look for a long number – the tracking code – and, if it has ‘UA’ before the digits, you’re on the older version.
Navigation
What is Google Analytics 4?
 Google Analytics has long been used to measure customer behaviour and preferences, helping businesses improve their websites and user experience. GA4 is a future-proofed version of Analytics that utilises machine learning and in-depth data to really dig into user behaviour. It is an update on Universal Analytics, with data that is more relevant to current-day businesses, user trends, and data protection laws.
As with many new products, GA4 can seem a little overwhelming at first. For those familiar with Universal Analytics, there are some big changes to get used to. And for those who’ve never used Analytics at all, it’s a whole new system to learn. However, don’t let this put you off. Take things slowly and start getting to know the interface and the options available. With a bit of time and learning, GA4 will offer a huge amount of value and insight that can help you improve sales and customer retention.
Features and Benefits of GA4

Google states that GA4 offers “a more complete understanding of how customers interact with your business.” Not only does advanced machine learning help fill data gaps and provide useful behaviour predictions, you can really get into the nitty gritty of your user demographics and actions based on very specific criteria.
As a relatively new platform, Google is still adding features to make GA4 more useful to business owners and SEO experts. There are also still a number of bugs to iron out, and the interface continues to adjust while Google figures out the best configuration. Just be aware that information may not be in the same place every time you check.
Eventually, of course, these changes will become fewer and farther between.
You may not need all of the many features available in GA4, but here are some of the best options to help you analyse user behaviour on your website:
Trend alerts and anomalies. By notifying you of significant trends and anomalies in your data, GA4 highlights potential changes or current fashions to help you identify new customer needs and predict future behaviour. It can also help highlight spam activity.
Churn probability. Identifying churn probability – or how likely a customer is to stop doing business with you – can help with budget forecasts, development of future marketing plans, and user experience improvements.
Potential revenue. How much are your customers likely to spend on your business? You can delve further into data to identify higher-spending customers, who you can then use to create audiences to target high-value users.
Google Ads integration. By including a deeper integration with Google Ads, GA4 helps you transfer data between the platforms in order to target granular user groups with paid ads.
Unfragmented data. Whereas UA splits audiences by platform or device, GA4 brings all that information together so that you can get a more comprehensive look at the actions and journeys your users take.
Life-cycle reports. UA’s focus on customer acquisition is helpful, but only to an extent. With GA4’s life-cycle reports you can see a much more rounded customer journey.
Cohort analysis. Create user groups based on certain actions or attributes, and see how they use your website. This can help, for example, with identifying the time between a first visit to your site and a purchase.
How to Set Up GA4
 GA4 requires a tracking code on your website in order for it to collect data. This can be input either directly or via Google Tag Manager. Speak to your developer if you don’t know how to add this yourself, or use a suitable plugin if you use a WordPress site.
If you already have Universal Analytics
- Log onto Google Analytics and select your Universal Analytics property.
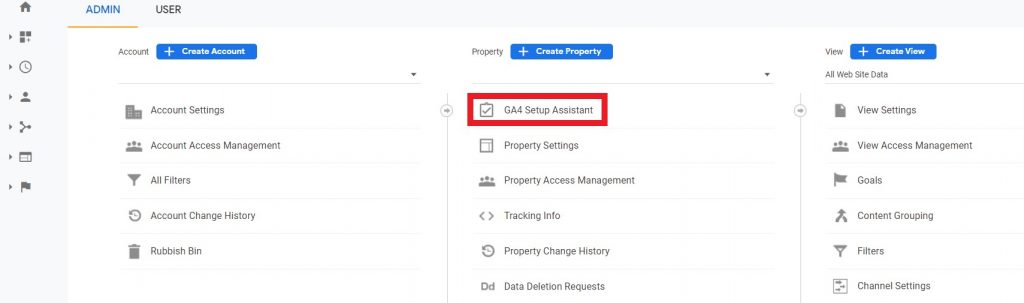
- Navigate to Admin (shown via a cog symbol).
- Under the Property column, select GA4 Setup Assistant.
- You’ll be asked to either create a new Property or connect to an existing one. Select Create a new property (unless you do already have an existing one under a different account).
- Select Create Property.
- You’ll be presented with a list of steps to take in order to setup GA4. I go into these in more detail below.
If you don’t have Google Analytics at all
- Navigate to Google Analytics and follow the instructions to set up an account.
- Choose a name for your account (usually your company name) and select any appropriate account data sharing settings.
- Select Next.
- Enter a name for your Property (this could be your company name again) and choose your time zone and currency.
- Select Next.
- Enter some details about your business if you want. This is optional, so you can also skip this step.
- Select Create.
- Accept Google’s terms.
Setting up the Basics of Google Analytics 4
Add data streams
 A data stream is a section you create in GA4 to hold the data collected from your website and to track user journeys. You’re only likely to ever need one data stream (i.e., for your website), but may need more if you also have apps.
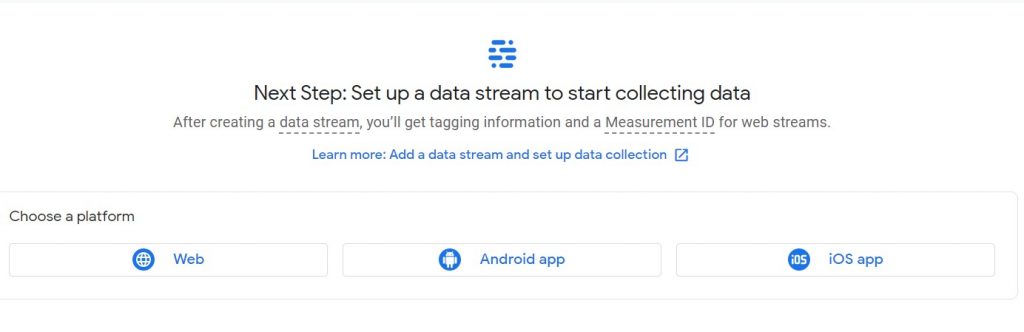
After you create a property, Google will prompt you to set up a data stream. If you’ve created a property and then left Analytics, simply reopen it and go to Settings (the cog symbol to the bottom left of the screen), then choose Data Streams under the Property column.
You now have the option to add any of three platforms: web, Android app, or iOS app.
Select the web stream for now and enter your website address, and a stream name. The stream name can be anything you like, but once it’s set, you can’t change this name. Select Create Stream.
You’ll be provided with a tag to add to your site, along with instructions. Remember, if you’re not familiar with entering basic code into your website, don’t know how to use Tag Manager, and don’t have a WordPress site, you will need to ask a developer to install this code for you.
Check your tag works
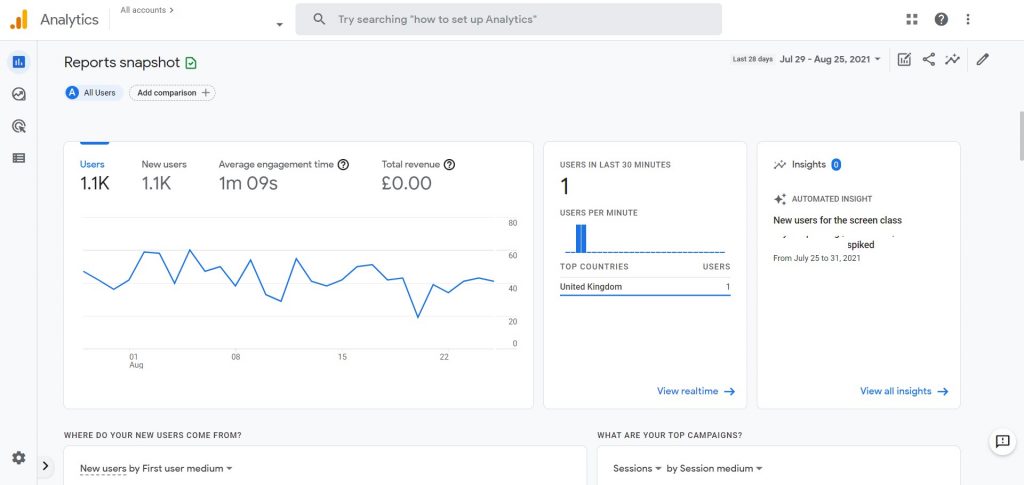
In order to track data, your tag needs to work correctly. Once it’s installed, open your website in a separate tab. Back on the GA4 property, navigate to Reports > Realtime. This tells you about users currently on your site and those that have been there in the last 30 minutes. If you have your website open in another tag, you should see some data in the Realtime report.
If you don’t see anything, after a few minutes, speak with your developer about troubleshooting and make sure the tag is properly installed.
Track events
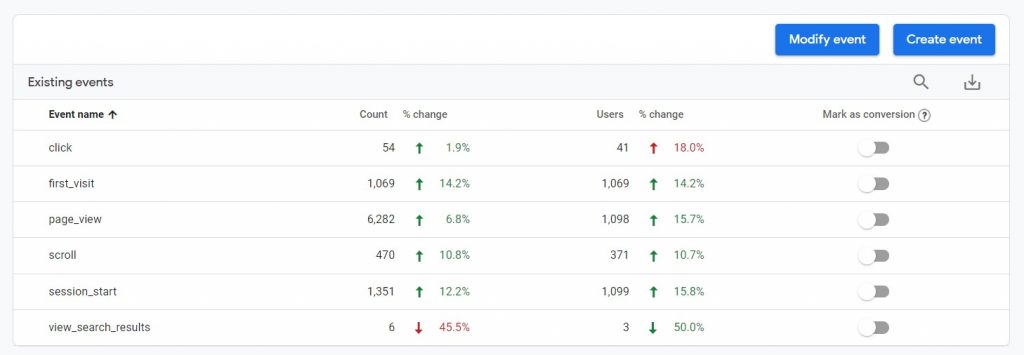 GA4 will automatically track a number of events including page views, outbound clicks and video engagement. You can configure it to track events that are unique to you, but this it out of the scope of this guide and you may need to speak to your developer to help implement the changes.
Instead, we’ll take a look now at where to find some of the most useful data that Google tracks automatically.
View data
Open the Reports option from the left-hand menu. You may only see a symbol of a bar chart. Click on this.
Under Acquisition, you can see how many visits you’ve had to your website. The User acquisition report will show you how many individuals have visited your site, while the Traffic acquisition will show you how many visits in total you’ve had. I.e. a single user might visit your website twice, so they’re counted once under the user report and twice under the traffic report.
These reports will also tell you the source and channel of your traffic. Channel is the type of traffic e.g. organic, paid, social. Source is the exact location they came from, e.g. Facebook, Google, or the specific name of a referral site such as yell.com.
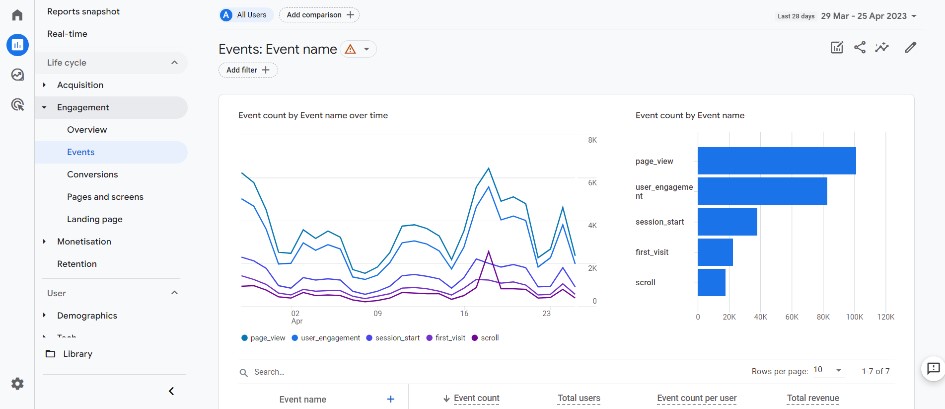
Under Engagement > Events, find out what users did while on your site. This gives you an idea of how much or little they are interacting with your content. Did they download a file? Click on a link? Scroll through your content?
It’s worth noting that the default events set up by Google are only useful to a certain extent. To get more meaningful data, you should speak with your developer about setting up parameters and custom events.
The Landing page report under Engagement shows the first page a user sees when they enter your website, as well as how long they spend on this page. This helps you identify your most popular pages, and those that could be improved through keyword research and better SEO practices.
Finally, take a look at Demographics > Overview. Here you can see where your users are coming from by country and city, as well as other helpful demographic information such as age, language, gender and interests. You will need to have a large amount of traffic to your website to view some of this data, as Google enforces a minimum threshold in order to protect personal data.
Conclusion
Big changes can often seem intimidating, but they don’t have to be. Although Google Analytics 4 will certainly require you to take on board a lot of new information, and may require extra support from a developer, it should ultimately give you more flexibility and useful insight into your data.