
What is Performance Max?

Performance Max – or pMax – is a type of goal-based ads campaign that makes use of Artificial Intelligence and machine learning to run the best ads based on your goals and the data it has available. It also aims to simplify advertising by eliminating the need to create a new campaign for each platform (e.g. YouTube, Search and Display).
You provide Google with a number of assets such as image, video, and text, and Google then uses those to create ads across its platforms. Assets are mixed and matched depending on the platform, the search, and general performance.
Like any type of campaign, there are advantages and disadvantages to Performance Max. Here are the main things to look out for.
Performance Max Pros
Less Time-Consuming
Performance Max campaigns should be less time-consuming to set up and manage than other campaigns. Most of the work and optimisation is done automatically by Google, and you only have to create one campaign in order to advertise in multiple locations.
Continuous Optimisation
Thanks to the AI technology it uses, pMax campaigns are continually and automatically optimised. So the more views, clicks and conversions you get, the better your ads should perform.
Improved Targeting
While you don’t get as much control over pMax as you would on other campaign types, you do get to utilise Google’s knowledge of audience behaviours. This is so vast that no individual company could ever hope to get near it with their own data. So your campaigns can be targeted based on Google’s expansive data, not your own limited information.
Performance Max Cons
Less Control
There are very limited opportunities to manually tweak pMax ads, which means you can’t experiment to find what works best, or make changes to better suit your strategy and audience. Whilst, theoretically, Google will do all this for you instead, it’s not a perfect system and Google’s automation has been known to be poor at times.
Automation Isn’t Always Best
You may think you can set off a pMax campaign and then just sit back while it brings you lots of leads, but this isn’t necessarily the case.
Like with any ads, you can end up wasting a lot of money if you don’t set up and run campaigns effectively. You still need to keep an eye on any Performance Max campaigns to make sure you continue to see the best results.
Negative Effects on Other Ads Campaigns
Because Google prioritises pMax campaigns over almost all other campaigns, you could see worsening results on your other ads. When monitoring your new Performance Max ads, remember to keep an eye on the performance of other ads running simultaneously.
Potential Higher Cost
Performance Max campaigns use machine learning, which means they need data to function well. If your ads aren’t generating much of a response, or your budget is too low, the AI can’t learn and so significant improvements can’t be made. This will mean running less effective ads for a longer time, which could cost you more money than necessary.
When to Use Performance Max Campaigns
Performance Max is a good option if you just want to get started with ads, don’t have much time or knowledge, and/or don’t have a very strict budget to stick to.
However, as they are a goal-based campaign type, it’s important to have clear, measurable goals in place that Google Ads can access. This means that the ads need to be able to track sales and leads. You may need to set up specific performance goals before running these ads.
Finally, pMax campaigns are generally intended to run alongside keyword-based search campaigns to expand audiences across different platforms. You don’t have to run them alongside other ad campaigns, but performance may be better if you do.
How to Set Up Performance Max
1. Set Up An Account
If you haven’t already done so, set up an account with Google Ads. You won’t be charged anything until you start running ads.
2. Create a New Performance Max Campaign
From the dashboard, select Create (or select the colourful ‘+’ symbol), then Campaign.
3. Choose Campaign Objectives
When prompted to choose a campaign objective, select one of the follow lead-based options:
- Sales
- Leads
- Website traffic
- Local shop visits and promotions
4. Select Goals
You will then be asked to choose conversion goals such as phone call leads or purchases.
Google will automatically select some goals, but you should be sure to only keep those that are vital to your campaign. You can remove goals by selecting the three buttons next to them and deleting them.
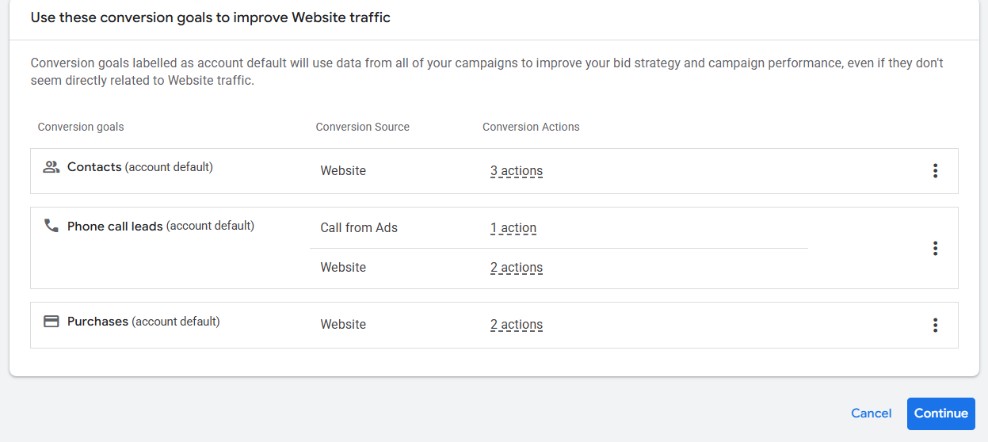
Select Add Goals if you want to add more to your list. If you don’t see the option, you will have to create additional goals. To do this, you’ll need to navigate away from campaign creation. Don’t worry, your work so far will be saved as a draft.
Read how to create goals.
When selecting your campaign goals, remember to consider what your aim is for this specific campaign. Performance Max works best for goals where a user is actually making a purchase.
Once you’ve completed this step, select Continue.
5. Select a Campaign Type

Select Performance Max from the list of campaign options.
6. Connect Merchant Centre (Optional)
If you want to advertise products on your website and have a Merchant Centre account, connect this to your campaign. All products from the account will then be available to advertise within the campaign. You can select specific feeds if you don’t want to advertise all products.
If you don’t yet have an account, learn how to set up Google Merchant Centre.
7. Final URL and Campaign Name
Enter a Final URL. This is the page a user will end up on once they click your ad.
This is where you can also choose a name for your campaign. Choose one that briefly explains what the campaign is for.
Select Continue.
8. Bidding and Target Costs
You have two options to focus your bidding:
- Conversions will aim to get as many conversions as possible for your budget
- Conversion value will aim to get more higher-value conversions for your budget (which may result in fewer actual conversions)
Unless you have multiple conversion goals set up with different conversion values (e.g. individual products imported through Merchant Centre), you should select the Conversions option.
You can also choose a target cost per option, but I would recommend against this if you’re a beginner.
9. Customer Acquisition
In the next step, you can select whether to “Adjust your bidding to help acquire new customers”.
Choose this option if you want to use the campaign to target new customers rather than (or as well as) existing customers. You will need to provide a list of at least 1,000 existing customers so Google knows who they are and can target appropriately.
Remember that the number of conversions will probably be lower using this option. Your adverts will be reaching cold leads at the start of the sales funnel who will take more time (and more spend) to convert.
10. Campaign Settings

This is where you can target users in specific locations or those who speak particular languages.
Opt for the default location or select Enter another location to expand your reach and make use of additional options such as location exclusions and location by radius.
Language selections will be offered depending on your choice of location(s).
The settings here also allow you to add a schedule for your adverts (under More Settings). This is useful if you know when your customers are likely to browse and/or purchase, or if you want to limit the times in which your campaign runs.
Once done, select Next.
11. AI Asset Generation (Optional)
With AI, Google Ads can automatically generate assets for your campaign. Feed in some data such as your website address, linked social media sites, products and services, and a business description.
Once the data is entered, select Generate assets. Or, if preferred, you can Skip this step.
Remember that, if you do use AI asset generation, to double-check the assets for accuracy and relevance.
12. Asset Groups
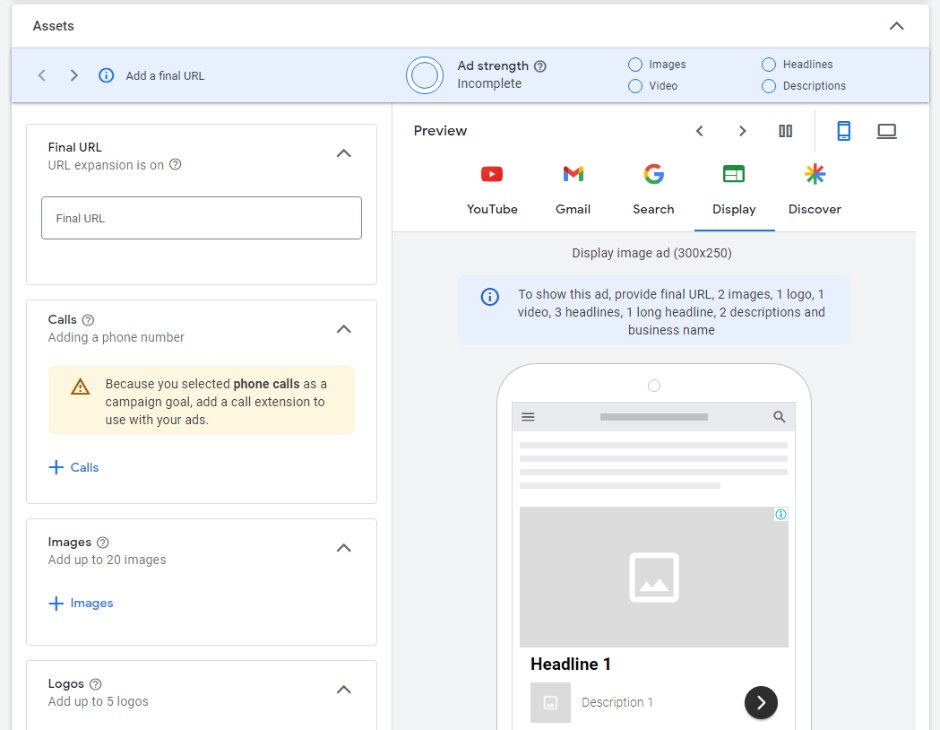
Your asset group includes any images, text and video that will be used within your ads. If you generated AI assets in the last step, the Asset group stage will give you the opportunity to check and amend your new assets. If not, you will have to enter and upload assets manually.
Google recommends you include the below number of assets, though you can also include more or fewer (minimum and maximum numbers also apply).
Text
- 11 headlines
- 2 long headlines
- 4 descriptions
Images
- 4 landscape images, ratio 1.91:1
- 4 square images
- 1 logo, ratio 1:1 (square)
- 1 logo, ratio 4:1 (landscape)
- 2 portrait images, ratio 4:5
Video
(Videos should all be 10-60 seconds long.)
- 1 landscape video, ratio 16:9
- 1 square video
- 1 vertical video, ratio 9:16
Because pMax adverts appear across all of Google’s platforms, including YouTube, video assets are necessary. Google can generate AI videos, but recommends that the advertiser uploads at least one video of their own. Simple videos can be created through platforms such as Canva.
Google can also copy assets from other ads if you have them, making it easier to complete this section.
If you have already connected a Merchant Centre account, don’t upload the same images that are used there. Google will automatically pull these over. Instead, consider adding lifestyle images of your products being worn or used.
Be careful to look through all the available assets – there are more available than specified above – and add as much information as possible. The more assets you provide, the better Google can mix-and-match to find the most successful combinations.
13. Signals (Optional)
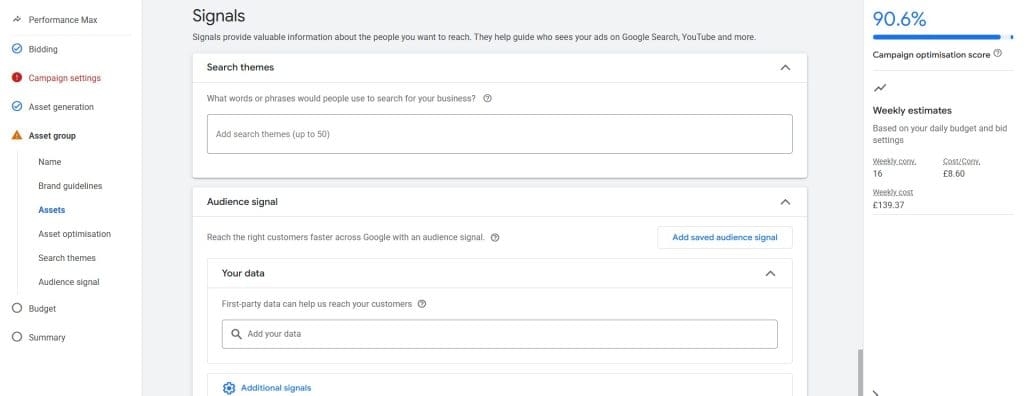
Signals help Google understand the type of people that you would like to reach. They include audience segments, remarketing audiences, and interests and demographics that you upload to your campaign.
This is optional but, if you have the data, it will help Google’s automation more quickly target the right kinds of users (which could save you money).
Remember that an audience signal is used only as a suggestion. Your campaign won’t necessarily target users on that list, but the information will help Google start to learn about your audience.
14. Budget
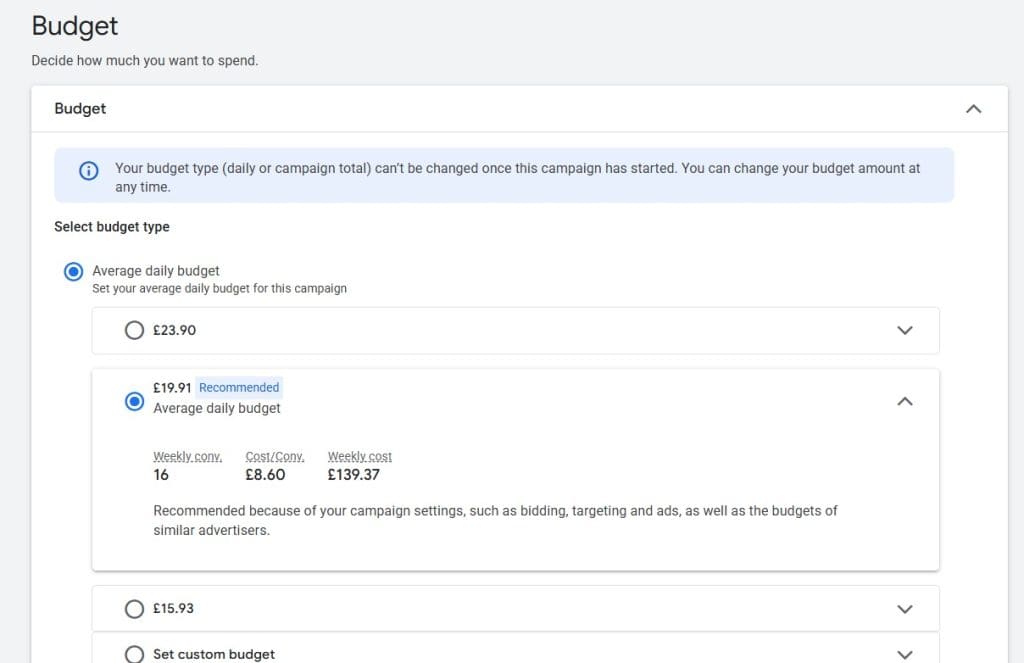
There are two budget options for Performance Max campaigns: average daily budget and campaign total budget.
Campaign total budget is how much you want to spend in total for the duration of your campaign. This is only suitable for time-limited campaigns.
If you choose a daily budget, this is averaged out across the month, so you may spend more on one day, and less on another. But over the month, you will spend (approximately) your daily budget multiplied by the number of days in that month.
Select a budget that is suitable for your campaign and value of your products/services. Too small and you may receive little to no conversions. Too high and you could find yourself spending more than you’re making. In this step, Google will make some suggestions that you can accept or ignore.
It’s worth experimenting with budget, but you need to give each test several weeks to run in order to make useful comparisons.
Once a budget is decided, select Next.
15. Summary
This final step gives you the chance to review the options you have selected across the campaign. Cross-check all the information is correct and fill in any missing information. Then, when you’re ready, launch your campaign.
Conclusion
If you’ve already used Google Ads, there will be some elements of Performance Max that are familiar. While experienced marketers lament the loss of control in AI-powered ads, for beginners this can provide easier set up and management. Performance Max allows you to set up effective ads quickly and easily, although a more in-depth knowledge will help you optimise for even better results.